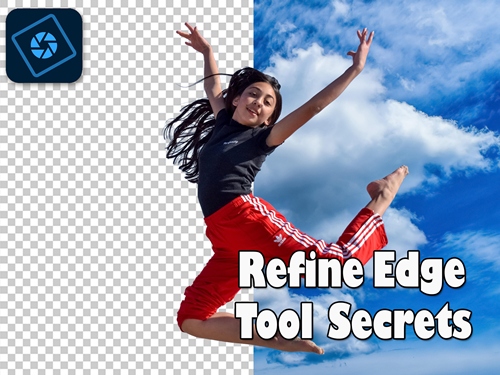
Refine Edge
In last week’s post about the Magic Wand tool, I talked about the importance of the settings for Tolerance. One setting I didn’t cover was Refine Edge. And guess what? Again, this is another command/option I’ve never really explained. Likely because I myself rarely use this option. I’m a bit old-school and do most of my selection touch-ups using the selection brush. I know, saying old-school is a stretch given I’ve only used Photoshop Elements (PSE) since early 2018 😊
First of all, you need to understand that Refine Edge in PSE is NOT a selection tool in and of itself. Rather, it is used to clean up, smooth, and perfect complex selections (such as hair, fur, or jagged edges) after making a precise as possible initial selection with tools like the Quick Selection or Lasso tool.
Part of me feels like this is a tool that really only comes in handy when I’m trying to extract a subject from a photo that involves fine details like hair, fur, or rough textures. Very seldom do I ever feel the need to use Refine Edge when making a selection around individual elements unless the edges are fuzzy or blurry.
Today I’ll show you how to take advantage of this option when working on a selection within any image (photo or otherwise) that has complex or less than crisp edges.
Smoothing Selections
Just a quick reminder; I use PSE 2024. If you use a different version, some of my screen shots may not look the same as what you see on your screen.
For simplicity, today I’m going to open the photo (from Pixabay) that you partially see in the featured image at the top of this post:
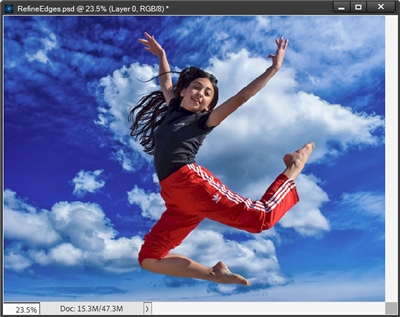
Note: If you’d like to follow along using this same photo, just click here and it will automatically be downloaded for you.
If you’ve been following me for any length of time you should know what I’m going to do first. I duplicate the photo, hide the original and rename the duplicate to Jumping Girl. I do this to preserve the original photo in case I mess something up during the following process.
I then set my Foreground/Background color chips to the defaults (press D). Next, I go to the Top Menu bar and click Select->Subject:
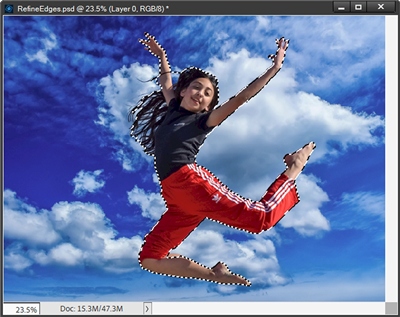
Note: Since Select->Subject wasn’t available in PSE until version 2020, some of you may not yet have access to that. If that’s the case for you, use the selection tool that is most comfortable for you and make a nice clean selection around only the subject desired. If you use the Quick Selection tool, it’s a good idea to ensure that the Auto-Enhance box is checked before making your selection.
I can’t stress enough that the better the initial selection is, the easier it will be to use the Refine Edge tool!
Refine Edge Of Selection
You should be able to see a few problems; especially around the girl’s hair that I’ve circled:
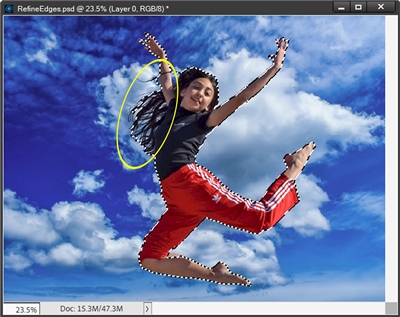
This is where Refine Edge is most useful. There are some other areas that may also need some attention but the hair is the toughest part. So, I may focus on the simpler areas first. Let’s just see how it goes!
Now I can either go to the Top Menu bar and click Select->Refine Edge or simply find and click the Refine Edge button in the selection tool Options.
Either way, PSE will open the Refine Edge dialog box and my selection now looks like this:
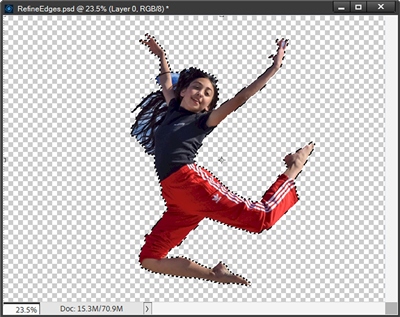
Unless you’ve ever previously used Refine Edge and “saved” settings, PSE (at least in version 2024) defaults the view to “On Layers” (selection only over “pixels” background) which is why the selection likely looks like that for you as well.
Let’s take a closer look at the options in that dialog box…
Refine Edge Settings
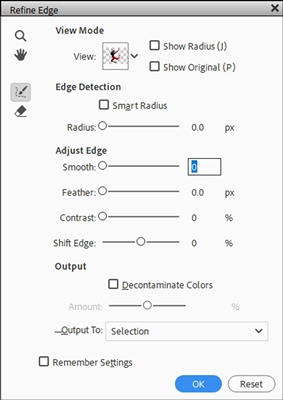
There are a lot of options here and I am going to take some time to “unpack” this dialog box so you can better understand the various settings. It will make things easier as I walk through the actual steps later.
Note: You may already feel comfortable with the settings. Or perhaps just brave enough to get right to the “doing”. In either case, feel free to scroll on down to the section labeled “Refining The Edge” and skip all this tech stuff 😊
First, to the left of View Mode you can see two icons: A Magnifying glass (Zoom) and a Hand (Hand Tool). You can use these if you like but they are largely unnecessary if you are using the shortcuts; Zoom (press Z) and Hand (press H).
To the right of those icons is View Mode. Just below that is a dropdown labeled View. This allows me to change how the selection is displayed so I can clearly see the problem areas. Clicking the down arrow on that dropdown will display the available View options:
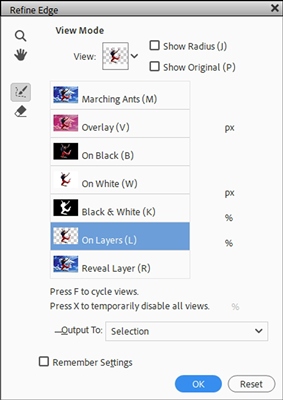
In the dialog box I can now see each of the view modes with a small thumbnail representation of how it will look. And each mode “name” has a shortcut option shown in parenthesis after. These should be self-explanatory. The last one – Reveal Layer, shows the image only – with no marching ants. To be honest, I’m not at all sure who would ever find that last option helpful 😉
I can just press F multiple times to cycle through the views.
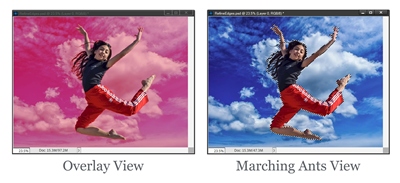
I recommend using Overlay or Marching Ants. You can choose whichever one out of all the modes looks to be the one that will work best for you.
Note: After selecting the desired View, DO NOT click OK. This will close the dialog box completely. Instead, just click somewhere outside the view options being displayed and those will collapse.
There are two check boxes off to the right in this “view” area; Show Radius and Show Original. Generally speaking, I’ve never found that I use these options. So, I’m really not going to say anything more than you can typically ignore these.
Below the View dropdown is the Edge Detection section. This tool is used to refine the radius of the entire selection outline. Most often, I don’t need to refine the entire selection, only specific areas. Regardless, this is what will control refinement.
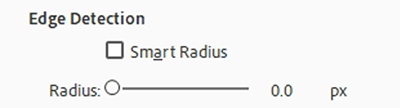
There are two primary options that will help control which areas are affected:
- Smart Radius: Checking this box tells PSE to dynamically adapt the radius size along different parts of the selection. It will automatically apply a narrow radius on sharp, well-defined edges and a wider radius on soft, blurry, or complex edges within the same selection.
- Radius: This slider determines the size of the boundary zone where PSE analyzes pixels. A smaller radius is ideal for clean, sharp, and distinct edges (like a hard plastic object). A larger radius expands the analysis zone, which is perfect for soft, complex, or semi-transparent edges (like hair, fur, or tree branches). Most often I find that starting with a Radius of around 2-5px is great when working on hair like I am today.
When Smart Radius is checked, PSE looks out into the pixels beyond the selection border to find where the subject ends and the background begins.
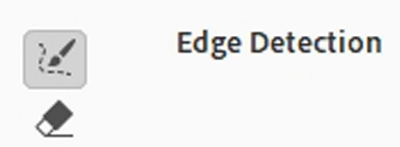
Now, just to the left of the Edge Detection heading, you can see two other icons:
- Refine Radius tool: This is the one that looks like a paint brush over marching ants. This is what lets me paint along the edges of the selection to expand or re-examine fine details like hair, fur, or rough textures.
- Eraser: The one that looks like the classic Eraser icon. It lets me paint back over areas where I used the Refine Radius tool to remove mistakes and restore the original selection edge.
Below Edge Detection is the Adjust Edge section.
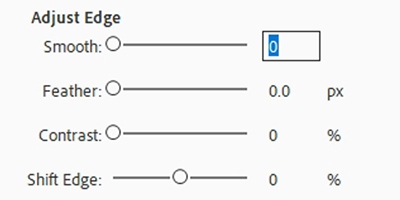
The Adjust Edge options help fine-tune the transition zone of the selection to eliminate harsh stair-step visual artifacts (jaggies) blurry halos, or unwanted background color bleed.
Here is a breakdown of how to use each slider to clean up the selection:
- Smooth (Removes Jaggies): Removes all jagged edges and small refinements (including hair) from the selection outline. The problem is this can actually work against capturing things like fine hairs. So, I don’t find this to be very useful. For most applications, I recommend leaving this set to zero.
- Feather (Blends the Subject into the Background): Creates a soft, gradual blur along the edge of the selection creating a gradual color transition between the selected object and the surrounding pixels. This comes in handy when isolating “real life” subjects like people. Using a very low setting (often between .2 and 1.5 pixels) gives the edge a natural photographic softness. Using a setting that is too high will make the edges look hazy, creating a ghost-like or halo effect around the subject. When working with hair I tend to set the Feather to .2px.
- Contrast (Crispens Blurry Edges): It does the exact opposite of Feather. It forces soft transitions or semi-transparent pixels along the edge to become either fully selected or fully transparent, resulting in a much crisper boundary. The only time I’ve ever found this to come in handy is if using the Smart Radius or Feather tools made the edges look too soft, fuzzy, or gray. I can increase the Contrast slider to sharpen them back up. Again, for most applications, I recommend leaving this set to zero.
- Shift Edge (Shrinks or Expands the Selection): Moves the entire boundary of the selection inward or outward by a set percentage. Moving the slider to the left (a negative value) shrinks the selection inward. This then hides the thin, annoying border of the old background color (the halo) that often gets trapped right at the edge of a cutout. Moving it to the right (a positive value) should only be used if parts of the subject’s actual edge have been accidentally cut off. For most applications, I also recommend leaving this set to zero.

Note: There is no “undo” feature in the Refine Edge tool. If you’re having trouble getting the selection to turn out just the way you want, press and hold the Alt key. PSE will change the Cancel button to a Reset button. While still holding down on the Alt key, press Reset and PSE returns to the original selection. Unfortunately, you may still lose all the current settings but you’ll still have the tool dialog box open.
Below Adjust Edge is the Output section.
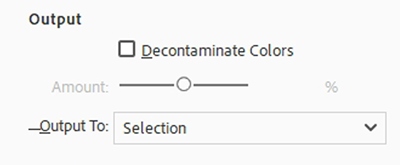
Once the selection is as clean as possible, this section is the final step in the Refine Edge tool. The two options here are: Decontaminate Colors (Remove Background Bleed): Replaces color fringes or “color bleed” (like green grass reflecting onto a model’s pants, or blue sky showing through hair) with the actual color of the subject. In most cases, I don’t see a need to do this and would caution you not to check this box.
The second option is Output To (Choose Your Destination): Click the drop-down menu to choose where to send the refined selection based on your project goals. Below are the options for the “destination”:
- Selection: Creates a standard “marching ants” selection on the current layer. Choose this to copy/paste only the refined subject or fill the selection with color.
- Layer Mask: Leaves the original image intact but adds a mask to hide the background. Choose this for the flexibility, as this makes it easy to paint any details back in that may have accidentally been cut out. Or to also remove any areas that weren’t as clean as desired.
- New Layer: Copies the refined subject onto a brand-new, transparent layer, leaving the original layer untouched.
- New Layer with Layer Mask: Creates a duplicate of the layer and attaches a layer mask to it. This is the safest, most preferred option because it provides the maximum flexibility while protecting the original layer, and allowing edits to the mask layer.
- New Document or New Document with Layer Mask: Sends the refined subject straight into a completely separate, blank PSE file.
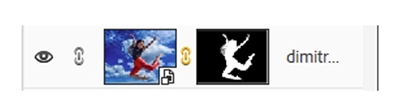
Typically, I set the Output to New Layer with Layer Mask. Using this option, I keep an extra copy of the original photo (just in case) along with the selection and layer mask. I can then modify the layer mask afterward to easily touch up any minor mistakes the automated tool might have missed.
Last but not least is the Remember Settings check box. Checking this box tells PSE to store the chosen parameters such as Radius, Smart Radius, Smooth, Feather, Contrast, Shift Edge, and Decontaminate Colors.
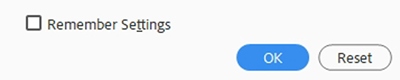
By doing this, the next time I open the Refine Edge tool on a new selection or image, PSE automatically loads those saved values instead of resetting to the software’s original factory defaults. If I want to save different settings in the future, all I have to do is open Refine Edge, adjust settings to new values, check Remember Settings and click OK to update with the new parameters.
Sorry if I’ve made your eyes roll into the back of your head. I really believe all of this information will help you use the tool more effectively in the long run. And I know it will make it a lot easier for me to walk you through refining the selection I’ve already made of that jumping girl 😉
Now, let’s take a look at actually using the tool…
Refining The Edge
So, here I am back at my original selection with the Refine Edge dialog box open:
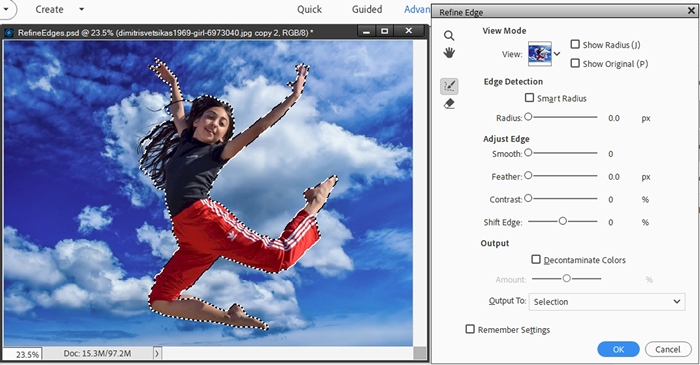
For now, I’ve chosen the View setting of Marching Ants. I’m just more comfortable with this option. I may switch to Overlay further down in the process but typically I don’t need to do that. Please feel free to use the view mode that works best for you.
Even at this small image you should be able to see that the problem areas are not confined only to the hair. There is a small section in the girl’s lower leg that wasn’t selected. And parts of fingers on both hands were also left off.
But, that’s why we’re here! I’m going to fix the “skin” sections first since they’re the easiest. I zoom in fairly close and start on the leg:
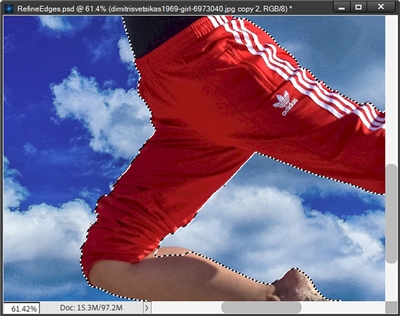
I click on Smart Radius and set the Radius size to 4px. Next, I click on the Refine Radius tool icon. My cursor changes to a circle with a plus sign in the center:
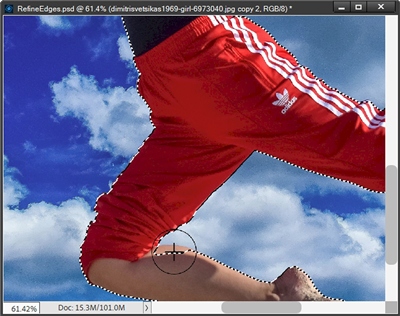
This “plus sign” cursor means my brush is set to Add to Selection mode which is exactly what I want. Now, all I have to do is click and drag over the area I need to include in the selection:
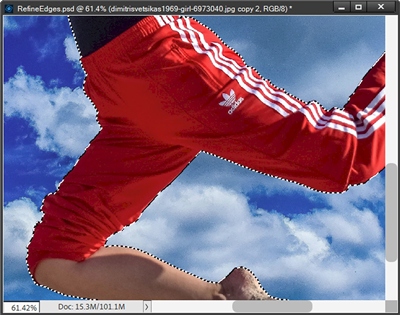
And if I accidentally include areas that I really don’t want, I can click on the Erase Refinements tool icon. My cursor would then change to a circle with a minus sign in the center meaning my brush is now set to Subtract from Selection mode. However, this tool will not subtract anything from the original selection.
The best part about using the Refine Edge tool to do this is I don’t have to be precise when brushing over the area to be added to the selection. The tool does that automatically based on the radius setting!
I’ve also done the same around the fingers on both hands. I’m not going to include an image at this point. I’m trying to keep this from getting any longer than is necessary. So, you’ll just have to trust me.
With the skin areas refined I zoom in next on the hair:
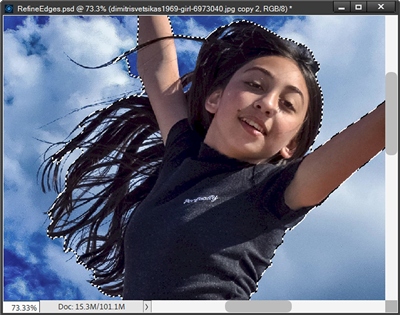
Clearly the hair is going to be a little more challenging than the leg and fingers. But I think you’ll be surprised at how easy it will be. The trick will be to keep as much of the sky as possible out of the selection
I’m going to keep the Smart Radius set at 4px and brush over the hair area closest to the girl’s face to see how the selection changes. As I brush over the hair, the key is to keep the plus sign over only the areas I want to keep or add to the selection:
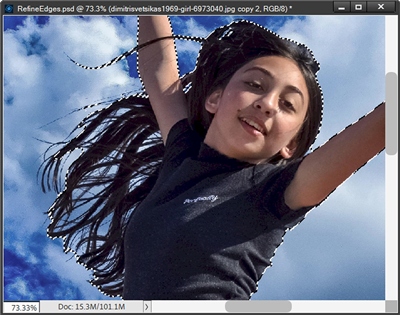
You should be able to see that the one large and two small sections of sky near the head are no longer part of the selection. But also notice that more at the end of the hair strand crossing over her arm has been added to the selection.
I’m going to continue brushing over the hair to see if I can eliminate more of the sky in the selection:
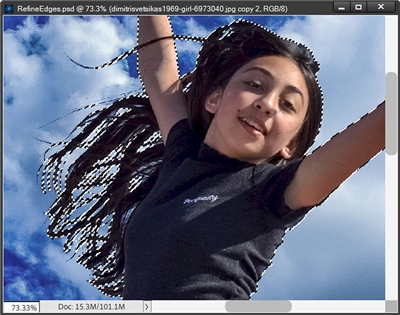
Wow! Even I have to admit this is pretty impressive. There are a couple of spots where there’s still some sky in the selection. But it looks really good so far. You can likely see that there are also areas where the very fine hair strands haven’t been picked up. Honestly, I’m not surprised.
But let’s see what happens if I lower the Radius to 2px:
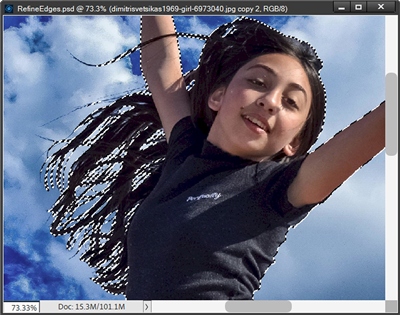
I don’t know if you can see it at this small image but that pretty much took out about as much of the sky as I could have accomplished the “old-school” way 😉 And I do think a bit more of the finer hair has been added to the selection.
The next thing I need to do is adjust the edge just a bit. I do this merely to give the edge that natural photographic softness I mentioned above in the settings discussion. I will use only the Feather setting; applying a .4px to start:
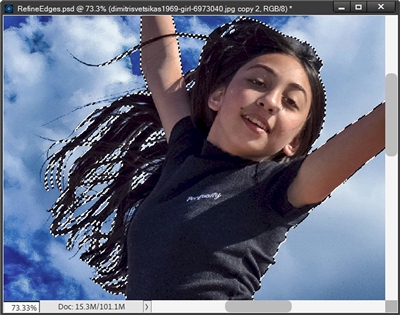
That was too much, some of the sky is back amongst the hair. So, I’m going to lower the Feather to .2px:
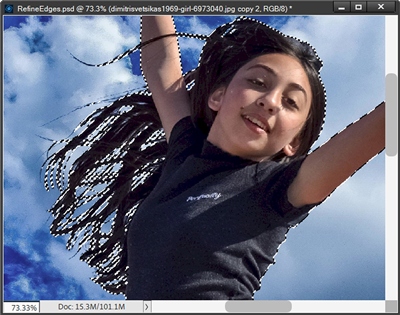
For this particular photo, I think I found the “sweet spot” for settings. Because of that, I am going to check the Remember Settings box before I forget!
And just to see how good this looks I am going to set the View to Overlay. This should give me (and you) a better view of how that hair looks right now:
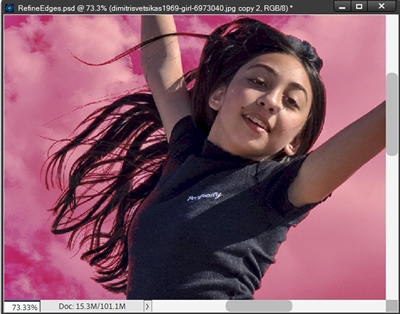
That looks pretty amazing, if I do say so myself. There’s no question that some of the finer strands of hair were sacrificed when I feathered the edge. But I may have a chance to revisit those after I get out of Refine Edge.
And I’m not ashamed to admit that I am honestly surprised by how well this has turned out! I’m going to zoom back out to full size so you can see the entire image:
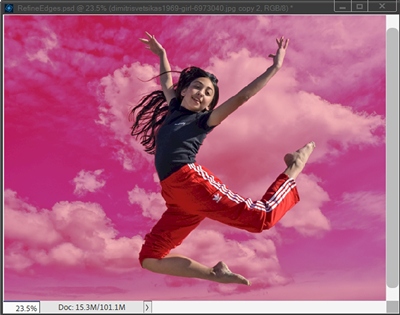
All that’s left at this point is to finish with the Output section. I see no need to Decontaminate colors. So, I click the down arrow on the Output To dropdown and select New Layer with Layer Mask:
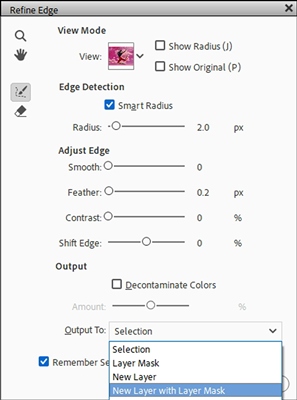
Note: This is the output format I almost always use. You are welcome to choose whatever output format fits your needs the best.
And this is what I have in my Layers Panel:
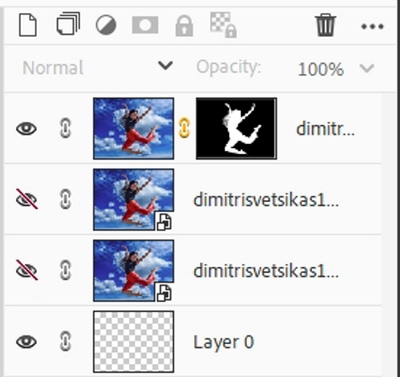
And here’s my masked, refined selection from that original photo:
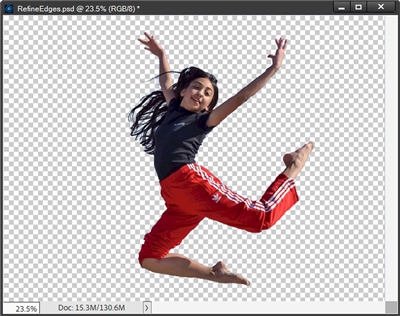
The real test of how well this Refine Edge process worked is to put a different background beneath this top layer. I’m just going to add a new layer and color it a vibrant green (#12fe06 ):
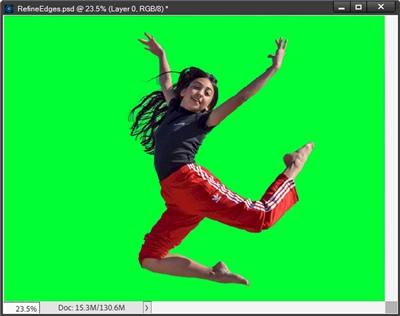
I can already see a few places that I may need to adjust but that’s why I output the refined selection with a layer mask. I’ll zoom in a bit closer:
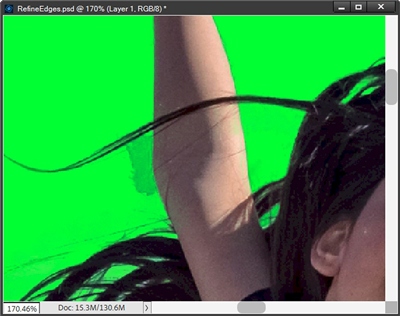
There’s this one spot of sky that somehow got missed (either by me or PSE). I ensure my Foreground/ Background color chips are set to the defaults. Then I double-click on the layer mask and select the Brush tool. With a small (5px) soft round brush I just brush over that area to remove it:
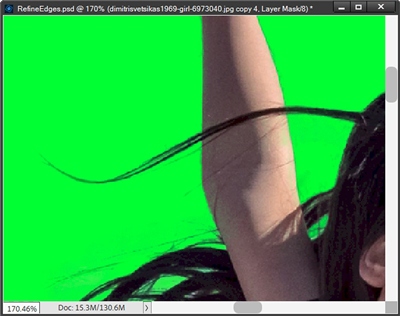
After that, I panned around the rest of the image and found just two other spots (circled) that need adjustment:
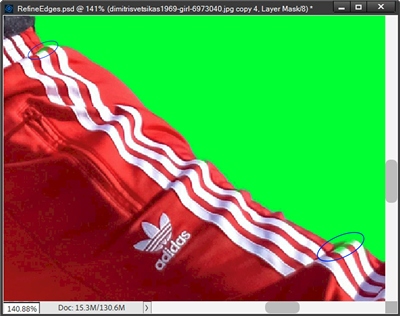
I simply grab the brush tool again. This time I need to swap my color chips (press X) so that white is on top. Then I add those sections of the pants back into the selection:
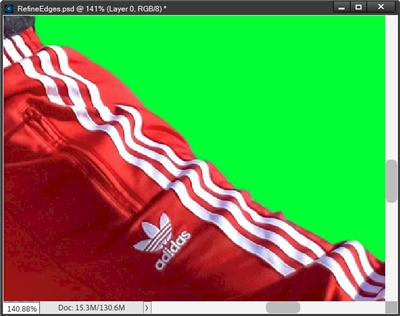
I am actually very happy with the hair and the way the feathered edge turned out. So, I don’t see a need to make any further adjustments. I can remove the background, simplify the masked image (causing the mask and image to be merged), and crop the image to size. Then I save the girl as a PNG file for use on a different background photo.
And here’s my final image of that girl jumping in a field:

I know this got longer than I like. But hopefully you now have a better understanding of how the Refine Edge tool works. And I’d encourage you to try using it the first chance you have. I know I may actually be using it more often 😊
Reminder Tips

The single most important tip is this; it’s best to start with an initial selection that is as “clean” as possible. Using Select->Subject usually does the trick.
If you don’t have that option, the next best is to use the Quick Selection tool. Whatever method you choose to use, try to get the best possible selection of the subject. It doesn’t need to be pixel-perfect on the first pass; the Refine Edge tool is designed to handle the fine-tuning.
I highly recommend that your first adjustment should be made using the Smart Radius option. This lets PSE automatically detect whether an edge is hard (like clothing) or soft (like hair or fur).
When setting the Radius Slider, you can start at around 2-5px (sometimes more depending on the subject). Then just slightly increase/decrease the value to expand/contract the edge-detection zone around complex textures.
Switch to the Refine Selection Brush tool when working with stray hair, fur, or grass. Paint smoothly along the edges, keeping the cursor’s plus sign over the area you want to include.
Don’t rely on just the marching ants. Change your View Mode to Overlay (red mask), On Black, or On White to clearly see missed spots, halos, or opaque background fragments left behind.
Use Feathering to soften the transition so the cutout doesn’t look pasted or harshly outlined against a new background. For most applications I recommend a feather of 1px or less.
Generally, I recommend that you avoid the Smoothing and Shift Edge options entirely.
I highly recommend that you set your Output To destination to either Layer Mask or New Layer with Layer Mask. These tend to provide the most flexibility if further adjustments are necessary.
Never permanently delete or erase your background pixels; a layer mask lets you paint back missed details later using a soft black or white brush.

Mystery is at the heart of creativity. That, and surprise. — Julia Cameron
Thanks for reading this week’s Tuesday Tip. Remember, if you have any suggestions or questions please don’t hesitate to “Message Me”. Check back next week for another tip about centering. Click “Follow Me” to stay in touch. I hope you have a wonderful week!